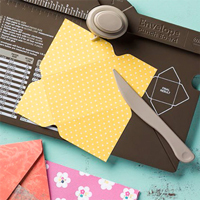
It's been crackers here in the house! These pictures are of my first crackers so easily made with the Envelope Punch Board. They are a size just perfect for a table favour or for a gift wrapping for a little something. Mine are Christmas themed and I just love them in the blue and green hues of the All is calm (guess what is going to be on my table this festive dinnertime!).

I used some of the Lost lagoon ribbon to tie the ends on the Blue version and on the green version there is the Organza Whisper White ribbon. You can just see a little All Is Calm Snowflake Embellishment there which looks fantastic tied in with the ribbon for a special touch, I have even seen an example of these being made into earrings they are so pretty.
The crackers are six-sided and I got my make details from a fellow Inspirin' Inkin' team member, Elaine Harding. You can also make four-sided crackers, but I think these are much more special.
The measurement for these little ones are as follows:
- Start with your DSP or cardstock measuring 6" x 5 7/8"
- On the 5 7/8" side, score at 1/2" (if using DSP then use the largest end of the score stylus so as not to tear the paper)
- Then score every 7/8" (I found the easiest way to do this was move the 1/2" initial score to the next whole number " (i.e. 1") mark and then score at 7/8" from this whole number (i.e. 1 7/8"). I would then move the last score to the next whole number " mark (i.e. 2") and score again 7/8" from this i.e. (2 7/8").
- Once you have repeated this you should have an initial 1/2" score and then six more scores 7/8" apart, giving you your six sides for the cracker.
- Spin your paper so that the 6" side is now along the top
- Score at 1", 1 1/2", 2", and then 4", 4 1/2" and 5"
- Take the first fold line on the 5 7/8" side and fold the paper on the fold
- With the envelope punch board line the paper up and punch at 1 1/2"
- Unfold and then fold on the second fold line
- With the envelope punch board, punch at 1 1/2"
- Keep unfolding and then folding on each fold line and punching until all fold lines have been punched
- Turn the paper round 180 degrees to line up the other end of the cracker
- Repeat steps 7-11 to punch the other end of the cracker
- Stick you cracker together along the 1/2" tab using Sticky Strip (so it can hold your contents Ok).
- Fold the two ends of the cracker alternating the folds so that the cracker end forms
- Tie your ribbon round one end of the cracker
- Put in your contents for your cracker
- Tie the other end with your ribbon again and add your embellishments
The crackers I have made have some decorated tealight candles in them which I found fitted perfectly in the diameter of this sized cracker. We all have surplus tealight candles I am sure, especially after a trip to that well known Swedish store! One of the other ones I have made has a chocolate Easter Egg in it, so proves that there are other times of years the crackers can be gifted. I think even a lip balm, some chocolate mint rounds, chocolate balls, or come to think of it, any other small chocolates would be just fine with me!
I have used the Label Love Stamp set for a label background by masking out the text in one of the stamps and then have used the Holiday Homes set again for my Christmas saying and snowflakes. I have punched my co-ordinating Pear Pizazz cardstock with the Artisan Label Punch to layer the label up. The saying is also punched from the white card with the Word Window Punch.
Another variation I made was with the Under the Tree Speciality Paper. Just a word of warning with this paper though as it is very good quality and thicker than DSP. When you fold the paper over to punch it in the Envelope Punch Board there are two layers to punch through and it is pretty tough to punch. It may well be this could be too much for the punch board in thickness and could break it, so if you do want to try this paper, be warned.

The second cracker on the bottom in this paper has a label from the Tag a Bag Accessories Kit. A simple saying stamped on it and it was an instant label.
I have gifts for my own festive table crackers which are a little bit special so need a larger cracker so I am off to make those now. I have snaps I have purchased and will of course be adding a traditional paper hat and joke too.
There are kits on offer in the usual stores to make your own crackers, but I think these are far prettier. I hope you agree think you would like to have a try yourself.
Suzanne
x
Products I used for the All Is Calm Crackers:
 |  |  |  |  |
 |  |  |  |  |
 |  |
Alternative products I used for the Under the Tree Crackers:
 |  |  |  |  |
 |
To place an order, book a workshop in your home or come to a class, just drop me an email at craftyinkbuds@sky.com. Remember you can now order online at anytime too.
No comments:
Post a Comment