Pages

Monday 15 September 2014

Frozen Olaf from Stampin' Up! Curvy Keepsake Box

I know, I know, a few too many posts on the blog for those of you receiving this via email you probably think I am starting to bombard you with a few too many emails by now.  It's just there have been a number of post circulating round from SU demos for cute projects made with the Curvy Keepsake Box, but I had a conversation about the Disney Frozen film in past few days and then this idea just came to me.  After a play today I could not resist sharing mine, I was just so excited after I finished him.

The original one dimensional idea for a Punch Art Olaf gave credit to Michelle Skit from Suitably Stamped. I have used the punches I have which vary slightly, but I just thought the Curvy Keepsake would make an ideal little base so he can be filled with goodies.  I am so chuffed with my little Olaf, he has been making me smile all day! I don't know whether it is some subliminal Disney magic working away or just that, as far as I know, this idea for the keepsake may be my very own and nobody else has done this yet!


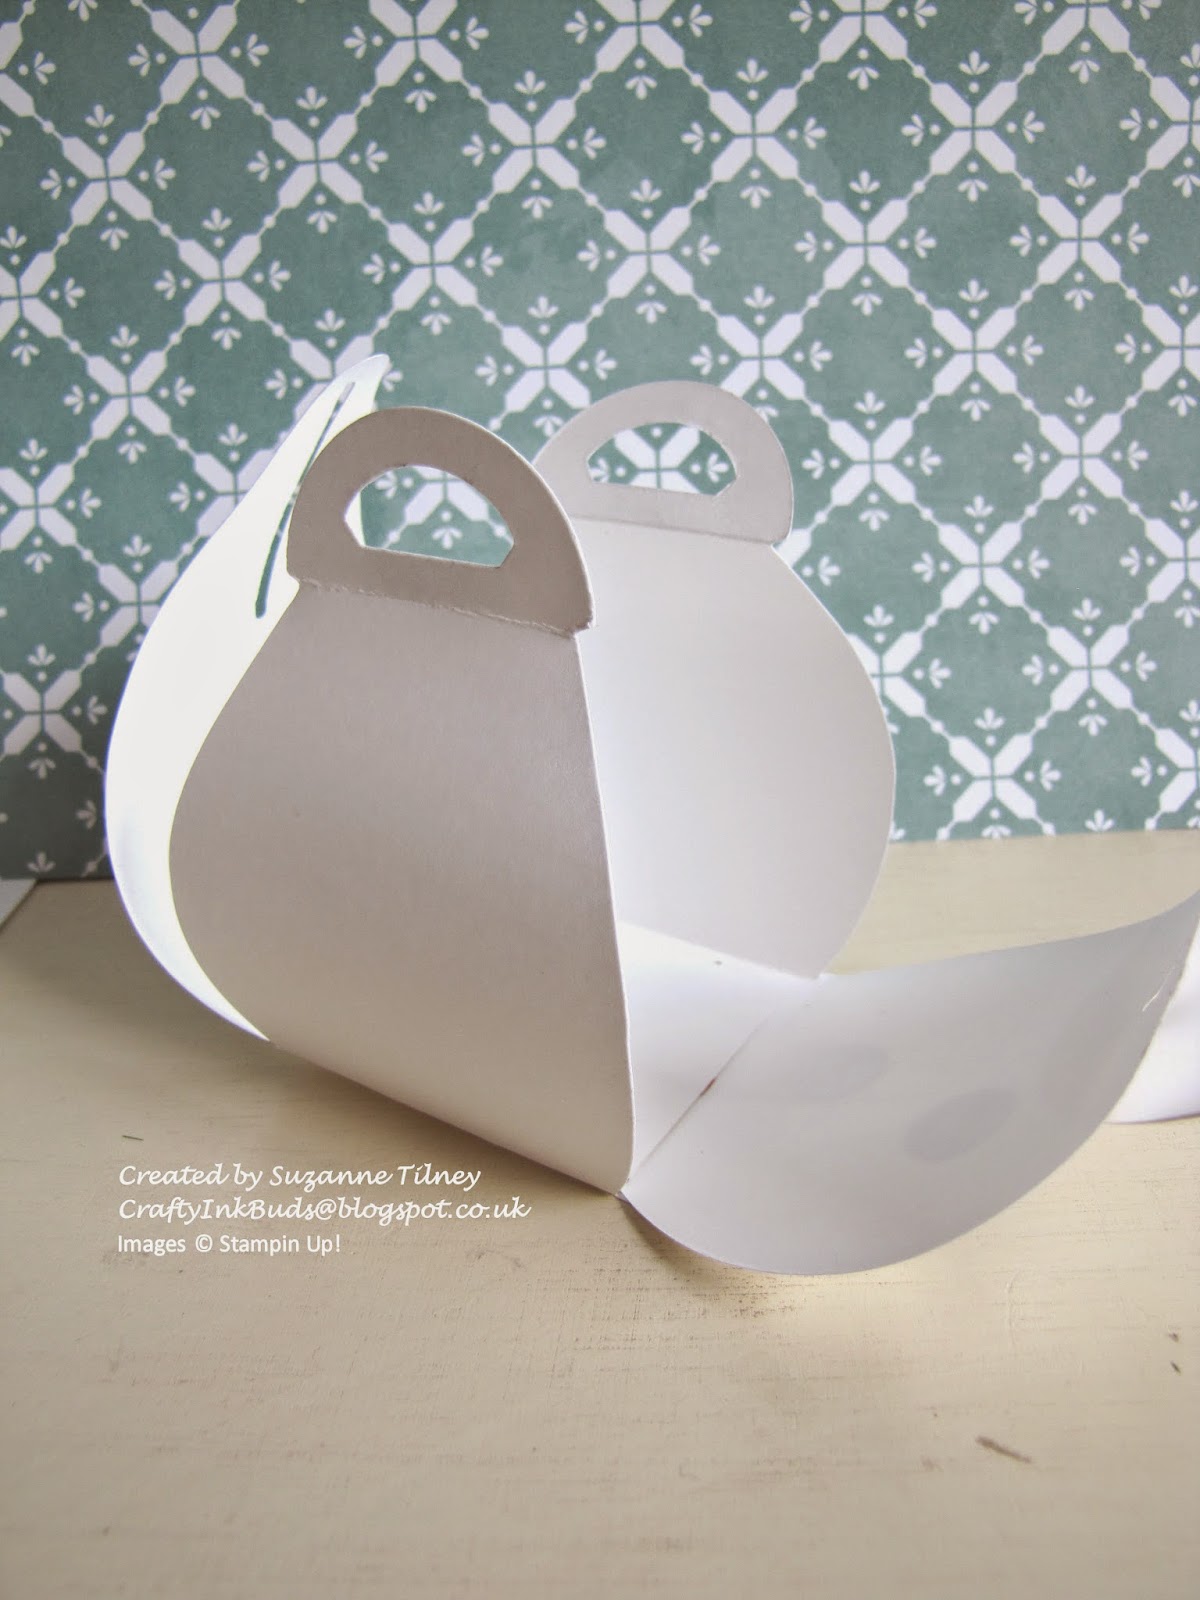
Here he is from the side view so you can see how I have stuck the punch art pieces to the little cut keepsake box.  I chose to stick it to one of the sides with the long slit rather than the ones with the handle  as I felt it gave his bottom section the best shape.


And here you can see the box opens up to allow you to fill it with lots of lovely goodies.  A great project for a children's party or just for Christmas too.


I used the 1 3/4" Circle for his middle which I layered with a second circle after sticking it to the box base and attaching the arms.  I cut a little off the bottom of the second circle to fit it once the middle was stuck on and I had attached the arms.  This helped to stiffen the card and also cover the arms at the back where they were fixed on. 

There is no 'arm' or even 'twig' punches from SU, no surprise, so the twigs for the hair and arms were free-hand with the paper snip scissors - luckily these are a dream to cut detail with and only a few attempts later I had reasonable twig-like effects.  I added two little 3/4" Circles of Whisper White for his feet too.

Olaf's top section is made up of the Extra Large Oval punched twice in white for layering again, similar to the middle section.  The mouth is then a Large Oval in Black with a small piece of white cut to size.  There is another Large Oval in white laid horizontally at 90 degrees across the top of the mouth. The carrot nose is just a 1/2" Circle punched in Tangelo Twist (our new in colour) and then a section punched off to give it a curve which I then snipped a bit more off until it curved as I wanted it to.

The eyes were the circles from the Owl Builder Punch which make up the eyes on the owl usually. Then all that was left was to add some little accent marks on the Buttons with a White Gel Pen and some black accents on the carrot nose and his surprised eyebrow expression.

So the list of the punches and products I used:


Cardstock: Whisper White, Basic Black, Tangelo Twist, Early Expresso

This (should be) the last one for a few days. I should really keep some projects to myself for a bit as I have some events to look forward to, including a demo at the Indigo Cafe, a community cafe in Lower Bourne, Farnham this Thursday.  If you are local then do come in and enjoy the warm, friendly cafe and come and see some of the new projects.  Just drop me a note to let me know you are planning on coming so I can allow enough for everyone to have a play.

Suzanne
x

To place an order, book a workshop in your home or come to a class, just drop me an email at craftyinkbuds@sky.com. Remember you can now order online at anytime too.

Sunday 14 September 2014

Forests of Festival of Trees

Sunday's are great for a walk through local areas of beauty and I hope we will be enjoying some fresh air later too, but in the meantime I am going to reveal my last project (or two) from my Festival of Trees selection.  At the beginning of the week I promised a special cad made from this great bundle from the Autumn/Winter catalogue and here is the card I made.


I have folded the card front to create layers to add my trees to. I created curved landscapes with embossed cardstock embossed with the Decorative Dots emboss folder.  I am loving this folder for it's lovely larger non-uniform dots which remind me of snowballs.  Not, by any means am I ready to be thinking of snow! Way at the back of the class there is a layer of sparkle from the All Is Calm speciality papers and also a layer of the Glimmer Paper I used on my previous cards too.  I feel am feeling a re-stock order is needed already for these two papers.


There are Lost Lagoon, Soft Sky, Smoky Slate and Pear Pizazz stamped images using the various tree designs in the set. I have also created a little banner for the sentiment. The banner is fixed with dimensionals to give it the raise which allows the top folded card to sit under so the card sits upright when opened.

Products I used:

Festival of Trees Bundle
Glimmer Paper Dazzling Diamonds
Decorative Dots Emboss Folder
Banner Punch ***Weekly Deal ***
Taffeta Ribbon - Soft Sky

Inks: Smoky Slate, Lost Lagoon, Soft Sky, Pear Pizazz
Cardstock: Smoky Slate, Whisper White

Another card for you today as whilst I was posting earlier this week I said I had an idea come to me. Here it is, a more traditional looking card which can also be for other occasions and not just Christmas.  And for me, this is a big step away from my usual blue and silver Christmas colours that I love.


This one uses the pine tree style of the set so I have created my own little pine wood by stamping in Pear Pizazz and the new Mossy Meadow.  I have stamped off twice for the lighter shade of the trees. This is just simply the technique of inking and stamping off once on your grid paper or spare sheet and then stamping the image onto your project.  


I have then added my glistening snow to the Mossy Meadow tree using a Glue Pen and some Dazzling Diamond glitter. The glue pens are great when adding glitter to get a fine thin layer of glue and no glitter blobs.


The shaded areas under the tree I added with a little Pear Pizazz ink and a blender pen. Just pick up a little ink on your ink pad on the blender pen and then gently add some sweeps under each tree trunk.

Tip: Tempting as it is, don't pick up the ink directly from the ink pad with the blender pen as you will end up with little white dots of no ink on the pad. Instead whilst your ink pad is closed, give it a little squeeze together. Open it up and there should be a little ink squeezed onto the lid of the ink pad and you can use this with the blender pen.

Extra Products Used for Card #2:

Good Greetings Stamps **Promotional Offer ***
Blender Pen
Dazzling Diamonds Glitter
Glue Pen

Cardstock: Mossy meadow, Pear Pizazz, Whisper White
Inks: Mossy meadow, Pear Pizazz

Enough of the tree love for now. I will work on some other projects to come back with soon.

Suzanne
x

To place an order, book a workshop in your home or come to a class, just drop me an email at craftyinkbuds@sky.com. Remember you can now order online at anytime too.

Friday 12 September 2014

Star light, shining bright, All Is Calm into the night.


Stampin' Up! have been providing us with lots of great promotions lately including the Big Shot and Dies promotional bundles giving us plenty of reasons to fall in love with the products. The Star Framelits I bought during the promotion are already featuring in several of my projects and, having had a sneek peek of some additional products coming, I know they are a firm favourite for some time to come.  

Well we have already seen the All Is Calm designer papers on the previous posts, but here it is again in the centre of my Star Framelit.  I have used some scrap strips to create my designer background under my Star cut-out layer.  The Star is cut out first with the framelits and then I have embossed using the Decorative Dots folder.

Tip: Remember, cut first and then emboss to make sure your embossing does not get squished passing through the Big Shot the second time.

There is a lovely Smoky Slate background card with a mat Whisper White layer.  Then on top of the Whisper White I have layered the strips in place where they will shine through the star.  The top embossed layer in Soft Sky has been lifted with foam dimensionals to give some more definition to the last layer and to allow the All Is Calm Embellishment to hang down on some Whisper White Baker's Twine.

I have added a rhinestone (when don't I add some sparkle!) to shine and catch the light as the snowflake moves and catches the light.

See the 'merry christmas', it is from the Good Greetings set FREE until 31st October with sales of £200 or more.

The sentiment is stamped on Lost Lagoon, one of the key colours of the Designer Paper.  All the papers come with a list of the co-ordinating colours so it is so easy to match your products.  The ribbon is also Lost Lagoon and from the Autumn/Winter catalogue.

I made my banner ends for the sentiment by just cutting the strip and then feeding one end into the Banner Punch.  This punch is a permanent companion on my crafting desk at the moment! Weekly Deals this week sees the Banner Punch I have used on offer.  It is only £8.63 until Wednesday of next week when the deals change.  Now that is a great deal!

Back again soon

Suzanne
x

Star Framelits
All Is Calm Speciality Papers
Decorative Dots Emboss Folder
All Is Calm Snowflake Embellishments
Basic Rhinestones
Lost Lagoon 3/8"(1cm) Silky Taffeta Ribbon


Good Greetings (FREE Stamp Set Promotion)

Inks: Lost lagoon


To place an order, book a workshop in your home or come to a class, just drop me an email at craftyinkbuds@sky.com. Remember you can now order online at anytime too.

Thursday 11 September 2014

Good Greetings To You

Remember back on 28th August when I announced the new Autumn/Winter Catalogue and I mentioned that all hostesses had the chance to earn a FREE stamp set called 'Good Greetings'? Well here is your first glimpse of it (and not your last I am sure).


It has a lovely curly font and 19 sayings for Christmas and the year ahead.  I have used the 'merry & bright' saying for this card.


The card is made up of a vellum layer over a Soft Sky background.  The Vellum is embossed with the Filigree Frame emboss folder.  Using the Texture Boutique machine (or your Big Shot) you can create fantastic designs and this one looks so pretty in the Vellum as the emboss takes on a white appearance.

Apologies for the lighting in this photo as you cannot see too well, but the middle tree is stamped using the Festival of Trees set (as we saw in yesterday's post).  It might show up better if you click on it and it is enlarged.

It is stamped using the Encore Silver Ink pad and the pine tree from the stamp set. The encore pads were introduced last seasonal catalogue, but new in this annual catalogue is the refill for these. They are pretty spongey on top, but you do need to make sure you get good coverage before stamping. The stamp image also needs longer to dry otherwise some smudging can occur, but the extra care is all worth it for lovely Silver (or Gold) stamping!

The other two trees are punched trees from the Glimmer paper I also used for yesterday's card and the silver dotty paper is from the All Is Calm DSP papers again.  I love the Dazzling Diamonds paper and I constantly have a supply of the glitter in the same colour tone too, it was one of my very first purchases from Stampin' Up!. There is definitely going to be more dazzle coming before Christmas is here!

For my tie and bow I could not decide which ribbon, the silver or the soft sky, so I just used both - extravagant I know, but it means you can see both too.  I just fixed each ribbon neatly to the reverse top edge of the card with a glue dot and then crossed over and held them to the card with a glue dot at the crossover point on the front side. I have then stuck a bow over this point with another glue dot.

The day was anything but bright when I took the photo, well that is what I am blaming my poor photography on, but you can just see a rhinestone on the centre flower of the frame at the top for a sparkling centre piece.  The emboss folder has flowers in the design so is going to be great to use for non-Christmas projects too, for those of you not ready to get into the Christmas spirit just yet!

I have just made a card of my design that came to me in yesterday's post time, but I have still another couple of designs to show you yet so keep watching....

Don't forget the Good Greetings stamp set could be yours for FREE if you host a party before 31st October and sales reach £200 or more, so why not start making a list of invitees now and get in touch to book a date.

Suzanne
x

Products I used:

Festival of Trees Bundle 137640 (also available separately)
All Is Calm Specialty Designer Paper 135823
Glimmer Paper - Dazzling Diamonds 135315

Good Greetings (FREE Stamp Set Promotion)

Inks: Basic Grey

To place an order, book a workshop in your home or come to a class, just drop me an email at craftyinkbuds@sky.com. Remember you can now order online at anytime too.

Wednesday 10 September 2014

Festival of Trees Star Show


Let me introduce you to my little forest of tress that has been sprouting up in our house. It is the gorgeous must-have Festival of Trees set from the Autumn/Winter catalogue.  I have a beautiful stepped card to show you will my little developing forest, but first let's talk some more about the trees.

One of the greatest things about the Stampin' Up! way of crafting, if I haven't convinced you before now, is the co-ordination and I love the bundle deals in the catalogues now allowing you to get the punch and the stamp sets at the same time for a discount. Yay, I love a discount!  One of the reasons I joined Stampin' Up! as a demonstrator. Anyhow, this set does just that, there is a lovely quality punch to punch out your little row of trees as you stamp them - simple!

Now this is a bit of a layout CASE from Christine Blain who had used the All Is Calm specialty designer papers as I have done and layered her trees on a background label framelit.  I decided to use my star framelits as a background for my card as I love the stars set. You have seen the papers before on my lovely little keepsake boxes on my last post.

I loved stamping the plain tree and then adding my instant decoration with the tinsel wrap stamp. The stamp set also has it's own little bird and star and sentiments of "A merry little wish" and "for lots of joy at Christmas".  There is even a little "To:" and "From:" for instant label creation.

There are five tree styles in this set.  They are not just for Christmas as I can already see that they will be good for Autumn and I am already imagining a lovely tree scene card with one of the other stamps in the set.

The other most useful punch on this card is the little star which I punched my Dazzling Diamonds Glimmer Paper onto for my sparkly star decorations. This little punch is part of the Itty Bitty Accent Punch Pack

As with some of the sets now in the catalogues this set is a Photopolymer set so is on the new transparent clear-mount background material which means it will need the clear acrylic blocks to mount onto (sold separately).  I am new to having a play with the clear-mount style and I am definitely finding more favourable to see the image positioning when stamping, and there is  the saving in storage space which is a blessing!

I have lots more tree projects to show you and will post in the next few days including the stepped card I first mentioned so keep looking.

Suzanne
x

Festival of Trees Bundle 137640 (also available separately)
Star Framelits 133723
Itty Bitty Accents Punch Pack 133787
All Is Calm Specialty Designer Paper 135823
Glimmer Paper - Dazzling Diamonds

Inks: Pear Pizazz, Lost Lagoon, Smoky Slate, Soft Sky

To place an order, book a workshop in your home or come to a class, just drop me an email at craftyinkbuds@sky.com. Remember you can now order online at anytime too.

Monday 8 September 2014

Wedding Bells

I love a wedding and since my own I just cannot help offering advice and ideas for other people around me who are getting married. From helping out with stationery designs to producing invites to just offering advice on how, when and how to go about things.  I must just be an old romantic at heart and just love the idea of it all.

On Saturday I saw a friend of old get married in the most beautiful setting on the outskirts of Guildford, Surrey, Loseley Park.  The venue was of significance to us too as our last visit we made there just days before our little one was born. It was so lovely to see it all again and to be there sharing in our friend's special occasion. The wedding was beautifully laid out and every detail was thought of.  

For a special couple, I needed to make a pretty special card. I am hoping the happy couple have surfaced enough by now to have opened their card and are jetting off somewhere not checking my blog! (why ever not?). I am sure it is safe to share with you, so here it is.


love included elements into a card to make it more personal. This card is made from nearly entirely retired products as they got engaged in Paris it just had to be the Artistic Etchings stamp set as it was perfect. I knew there was a reason I keep some retired products that I just cannot part with! 


There was a lot of Hessian involved in their theme which I know the groom was starting to get a little anxious about as jokes about a hessian dress were bantered about. I added the Burlap ribbon though to keep it in theme. The Burlap ribbon is a current product, available in the annual catalogue. 

The base card is a one I pre-bought, but the card is very similar to the NEW Kraft Cardstock in the catalogue which I am already using for lots of projects.  It is layered with the Natural Ivory card which I bought recently too and have not stopped using since I have had it.  The two match perfectly for more craft-style projects.

More about the details, as weddings are all about the details! The pink ribbon was from their original invite and the Very vanilla satin and the diamante ribbon slide from my own wedding stationery as an added personal touch. The soft flower trim is sadly another retired product, but once I had the idea for the flower heart I was sure of my design and it was just a case of adding the other elements.  The flowers were fantastic at the wedding in pinks and creams and so I couldn't have chosen better. The happy couple looked overwhelmed with joy throughout their day too so I know they have chosen well too.

Now that was a brief break from the seasonal catalogue and it's product.  I am off to munch on some more wedding favours and get back to the glitter and sparkle to show you some more seasonal ideas from tomorrow.

Suzanne
x

Current Products Used:

Kraft Cardstock 133674
Natural Ivory Cardstock 108630
Burlap Ribbon 132140
Crumb Cake Classic Ink Pad 126975
Sponge Daubers 133773
Scallop Tag Topper Punch 133324


To place an order, book a workshop in your home or come to a class, just drop me an email at craftyinkbuds@sky.com. Remember you can now order online at anytime too.

Thursday 4 September 2014

Curvy Keepsake Box Cuteness

Like a magpie to all things shiny, it seems my love of small cute things continues.  Look at these gorgeously cute little boxes made with the Curvy Keepsakes Box Die from the new Autumn/Winter Catalogue!


I know I have been keeping all the new autumn/winter catalogue items to myself, but now little one has started at school this week I am finally getting to play with all my new toys and get time to share some of them with you. Well, I am trying to fit in some chores too!

This dies is one of the the new thinlit style dies and the little curvy box is just perfect for table favours, small chocolate or even jewellery gifts. There doesn't just have to be sparkle on the outside you know!  

The die needs to be cut twice and then the two parts stick together and make the box. You just stick the base squares together at right-angles to each other.  Once stuck together, just curl up the two sides with the handle tops and then curl the remaining two sides up and slot them over the handle tops to keep it together. They take minutes!


Each box needs just half a sheet of 12"x12" paper and there is spare left surrounding for your tags and extras. Perfect, as in the die set there are a trio of bauble shapes too.  If you zoom in on the top photo you can just see I have used these with some of the spare paper to layer with my tags.


I made my curvy boxes from another new product in the seasonal catalogue, the All Is Calm Speciality Designer papers.  I thought this year I was going to be drawn away from my blue/silver Christmas colour theme, but these papers just immediately went onto my wishlist.  The designs are gorgeous!  The papers are speciality papers so there are sheets with metallic designs too.  Just check out page 22 to see how pretty they are.  Being as some of the papers are double-sided the box is already lined with great design too!  

The snowflake embellishment is also a new product. These are the All Is Calm Snowflake Embellishments.  I have added an added sparkle to the centre of mine with a Rhinestone, but they look just as lovely as they are out of the box. Thread some of the Lost Lagoon Silky Taffeta (A/W Cat), Silver 1/8" (Annual Cat) or Soft Sky Taffeta (Annual Cat) ribbons through the closure for a lovely finish.  My labels were stamped with sentiments from another great product you will be seeing more of, the Holiday Homes stamp set.

I hope you like them.  I already have another Christmas project in mind for these so they will be featuring in another post soon I am sure.

Suzanne
x

Products I used:

Curvy Keepsakes Box Die 135853
Holiday Homes Stamp Set 135095
All Is Calm Speciality Designer Paper 135823
All Is Calm Snowflake Embellishments 137383
Lost Lagoon Silky Taffeta Ribbon  135841
Silver 1/8" Ribbon 132137
Soft Sky 1/8" Taffeta Ribbon  134580
Baker's Twine Whisper White 124262

Inks: Soft Sky and Smoky Slate


To place an order, book a workshop in your home or come to a class, just drop me an email at craftyinkbuds@sky.com. Remember you can now order online at anytime too.