Pages

Showing posts with label Festival of Trees. Show all posts

Wednesday, 10 December 2014

Christmas Countdown #4 - Neat Treats with Gift Card Enclosures

Today's post is a quick reminder on just how easy it is to put together a little treat at Christmas and give it the Stampin' Up! treatment to make it a lovely personalised gift. This little package contains some yummy cookies I found at my local garden centre in their food section and an individually wrapped tea bag with a lovely saying on the packet. Perfect for a visit to a friend to make sure there is time to put the kettle on and have a chat.

I love other uses for the products we have and this is made from the Gift Card Enclosures which have made their first appearance in our catalogues. The gift card enclosures have slits pre-cut inside to add a gift card to decorate and give a unique personalised finish to a gift voucher or card, however simply wrapped round the treats and secures with a designer paper band here it has transformed into smart packaging for the goodies inside.

I decorated my package with the Under the Tree Speciality Paper.  I simply folded up three of the semi-circle flaps around the bottom half of the card holder whilst my contents were in place and then folded a band of the DSP round, securing it in place.  I then added the Real Red cotton ribbon and some Festival of Trees stamped and punched images. The pearls were a little extra snow effect for the tree.

Remember that the ordering for Stampin' Up! is pretty busy during the festive season so if you plan an order or have a wish list for Christmas then make sure you order soon to avoid the disappointment of it not arriving before Christmas. 

Stampin' Up! are advising that last orders should be placed by 15th December - yes we really are that close to Christmas - Eeek!

Don't forget to add some bargains to your wish list from the Clearance Rack and Year-End Closeouts.


I hope you are all further ahead with your Christmas cards, projects and shopping than I am!

Suzanne

x

Products I used for my Gift Card Enclosure Dress-Up:


To place an order, book a workshop in your home or come to a class, just drop me an email at craftyinkbuds@sky.com. Remember you can now order online at anytime too.

Sunday, 14 September 2014

Forests of Festival of Trees

Sunday's are great for a walk through local areas of beauty and I hope we will be enjoying some fresh air later too, but in the meantime I am going to reveal my last project (or two) from my Festival of Trees selection.  At the beginning of the week I promised a special cad made from this great bundle from the Autumn/Winter catalogue and here is the card I made.


I have folded the card front to create layers to add my trees to. I created curved landscapes with embossed cardstock embossed with the Decorative Dots emboss folder.  I am loving this folder for it's lovely larger non-uniform dots which remind me of snowballs.  Not, by any means am I ready to be thinking of snow! Way at the back of the class there is a layer of sparkle from the All Is Calm speciality papers and also a layer of the Glimmer Paper I used on my previous cards too.  I feel am feeling a re-stock order is needed already for these two papers.


There are Lost Lagoon, Soft Sky, Smoky Slate and Pear Pizazz stamped images using the various tree designs in the set. I have also created a little banner for the sentiment. The banner is fixed with dimensionals to give it the raise which allows the top folded card to sit under so the card sits upright when opened.

Products I used:

Festival of Trees Bundle
Glimmer Paper Dazzling Diamonds
Decorative Dots Emboss Folder
Banner Punch ***Weekly Deal ***
Taffeta Ribbon - Soft Sky

Inks: Smoky Slate, Lost Lagoon, Soft Sky, Pear Pizazz
Cardstock: Smoky Slate, Whisper White

Another card for you today as whilst I was posting earlier this week I said I had an idea come to me. Here it is, a more traditional looking card which can also be for other occasions and not just Christmas.  And for me, this is a big step away from my usual blue and silver Christmas colours that I love.


This one uses the pine tree style of the set so I have created my own little pine wood by stamping in Pear Pizazz and the new Mossy Meadow.  I have stamped off twice for the lighter shade of the trees. This is just simply the technique of inking and stamping off once on your grid paper or spare sheet and then stamping the image onto your project.  


I have then added my glistening snow to the Mossy Meadow tree using a Glue Pen and some Dazzling Diamond glitter. The glue pens are great when adding glitter to get a fine thin layer of glue and no glitter blobs.


The shaded areas under the tree I added with a little Pear Pizazz ink and a blender pen. Just pick up a little ink on your ink pad on the blender pen and then gently add some sweeps under each tree trunk.

Tip: Tempting as it is, don't pick up the ink directly from the ink pad with the blender pen as you will end up with little white dots of no ink on the pad. Instead whilst your ink pad is closed, give it a little squeeze together. Open it up and there should be a little ink squeezed onto the lid of the ink pad and you can use this with the blender pen.

Extra Products Used for Card #2:

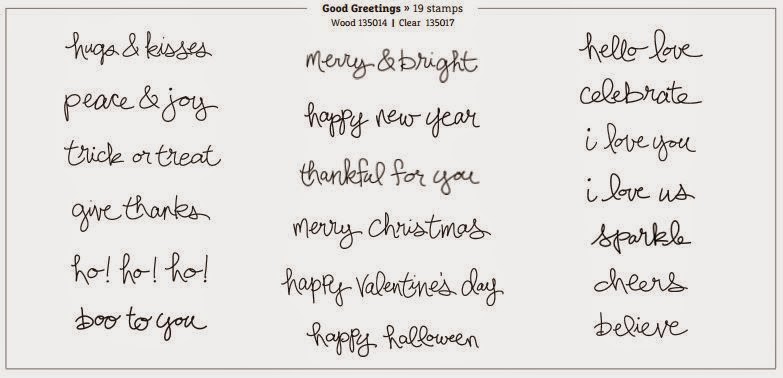
Good Greetings Stamps **Promotional Offer ***
Blender Pen
Dazzling Diamonds Glitter
Glue Pen

Cardstock: Mossy meadow, Pear Pizazz, Whisper White
Inks: Mossy meadow, Pear Pizazz

Enough of the tree love for now. I will work on some other projects to come back with soon.

Suzanne
x

To place an order, book a workshop in your home or come to a class, just drop me an email at craftyinkbuds@sky.com. Remember you can now order online at anytime too.

Thursday, 11 September 2014

Good Greetings To You

Remember back on 28th August when I announced the new Autumn/Winter Catalogue and I mentioned that all hostesses had the chance to earn a FREE stamp set called 'Good Greetings'? Well here is your first glimpse of it (and not your last I am sure).


It has a lovely curly font and 19 sayings for Christmas and the year ahead.  I have used the 'merry & bright' saying for this card.


The card is made up of a vellum layer over a Soft Sky background.  The Vellum is embossed with the Filigree Frame emboss folder.  Using the Texture Boutique machine (or your Big Shot) you can create fantastic designs and this one looks so pretty in the Vellum as the emboss takes on a white appearance.

Apologies for the lighting in this photo as you cannot see too well, but the middle tree is stamped using the Festival of Trees set (as we saw in yesterday's post).  It might show up better if you click on it and it is enlarged.

It is stamped using the Encore Silver Ink pad and the pine tree from the stamp set. The encore pads were introduced last seasonal catalogue, but new in this annual catalogue is the refill for these. They are pretty spongey on top, but you do need to make sure you get good coverage before stamping. The stamp image also needs longer to dry otherwise some smudging can occur, but the extra care is all worth it for lovely Silver (or Gold) stamping!

The other two trees are punched trees from the Glimmer paper I also used for yesterday's card and the silver dotty paper is from the All Is Calm DSP papers again.  I love the Dazzling Diamonds paper and I constantly have a supply of the glitter in the same colour tone too, it was one of my very first purchases from Stampin' Up!. There is definitely going to be more dazzle coming before Christmas is here!

For my tie and bow I could not decide which ribbon, the silver or the soft sky, so I just used both - extravagant I know, but it means you can see both too.  I just fixed each ribbon neatly to the reverse top edge of the card with a glue dot and then crossed over and held them to the card with a glue dot at the crossover point on the front side. I have then stuck a bow over this point with another glue dot.

The day was anything but bright when I took the photo, well that is what I am blaming my poor photography on, but you can just see a rhinestone on the centre flower of the frame at the top for a sparkling centre piece.  The emboss folder has flowers in the design so is going to be great to use for non-Christmas projects too, for those of you not ready to get into the Christmas spirit just yet!

I have just made a card of my design that came to me in yesterday's post time, but I have still another couple of designs to show you yet so keep watching....

Don't forget the Good Greetings stamp set could be yours for FREE if you host a party before 31st October and sales reach £200 or more, so why not start making a list of invitees now and get in touch to book a date.

Suzanne
x

Products I used:

Festival of Trees Bundle 137640 (also available separately)
All Is Calm Specialty Designer Paper 135823
Glimmer Paper - Dazzling Diamonds 135315

Good Greetings (FREE Stamp Set Promotion)

Inks: Basic Grey

To place an order, book a workshop in your home or come to a class, just drop me an email at craftyinkbuds@sky.com. Remember you can now order online at anytime too.

Wednesday, 10 September 2014

Festival of Trees Star Show


Let me introduce you to my little forest of tress that has been sprouting up in our house. It is the gorgeous must-have Festival of Trees set from the Autumn/Winter catalogue.  I have a beautiful stepped card to show you will my little developing forest, but first let's talk some more about the trees.

One of the greatest things about the Stampin' Up! way of crafting, if I haven't convinced you before now, is the co-ordination and I love the bundle deals in the catalogues now allowing you to get the punch and the stamp sets at the same time for a discount. Yay, I love a discount!  One of the reasons I joined Stampin' Up! as a demonstrator. Anyhow, this set does just that, there is a lovely quality punch to punch out your little row of trees as you stamp them - simple!

Now this is a bit of a layout CASE from Christine Blain who had used the All Is Calm specialty designer papers as I have done and layered her trees on a background label framelit.  I decided to use my star framelits as a background for my card as I love the stars set. You have seen the papers before on my lovely little keepsake boxes on my last post.

I loved stamping the plain tree and then adding my instant decoration with the tinsel wrap stamp. The stamp set also has it's own little bird and star and sentiments of "A merry little wish" and "for lots of joy at Christmas".  There is even a little "To:" and "From:" for instant label creation.

There are five tree styles in this set.  They are not just for Christmas as I can already see that they will be good for Autumn and I am already imagining a lovely tree scene card with one of the other stamps in the set.

The other most useful punch on this card is the little star which I punched my Dazzling Diamonds Glimmer Paper onto for my sparkly star decorations. This little punch is part of the Itty Bitty Accent Punch Pack

As with some of the sets now in the catalogues this set is a Photopolymer set so is on the new transparent clear-mount background material which means it will need the clear acrylic blocks to mount onto (sold separately).  I am new to having a play with the clear-mount style and I am definitely finding more favourable to see the image positioning when stamping, and there is  the saving in storage space which is a blessing!

I have lots more tree projects to show you and will post in the next few days including the stepped card I first mentioned so keep looking.

Suzanne
x

Festival of Trees Bundle 137640 (also available separately)
Star Framelits 133723
Itty Bitty Accents Punch Pack 133787
All Is Calm Specialty Designer Paper 135823
Glimmer Paper - Dazzling Diamonds

Inks: Pear Pizazz, Lost Lagoon, Smoky Slate, Soft Sky

To place an order, book a workshop in your home or come to a class, just drop me an email at craftyinkbuds@sky.com. Remember you can now order online at anytime too.